Design Module 3 : Artwork Design Bleed
What is bleed? And why do we need it?

Juan
Last Update a year ago
This module explains what “bleed” is and why it’s necessary in the design and print process.
We also explain how you can add bleed to a document you’ve designed. Finally, it gives you examples of eight common mistakes, along with suggestions on how to fix them.
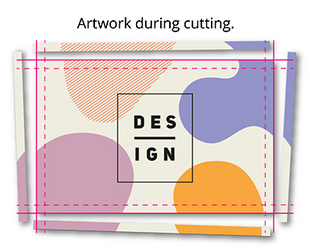
When your design extends all the way to the edge of the paper, you need bleed. Why? A commercial printing press prints multiple products onto large sheets or rolls of paper which then get cut down to size.
Because it’s impossible to cut precisely down to the millimetre, a little overprint is required on each edge. The standard margin for error required by printers is 3mm. This is the bleed area.
To understand how we account for variances in the cutting process, designers need to know about the bleed area, the trim line and the safe area.
Bleed area
Background colours and patterns must extend at least to the edge of this area to avoid unprinted white strips appearing at the edge of the document. The crop marks outline where the document should be trimmed, and the bleed is outside those marks.
Trim line
This is the guide for cutting out the final product. It’s indicated on your proof by crop marks (your design doesn’t need to feature crop marks; we’ll add them on your proof).
Safe area
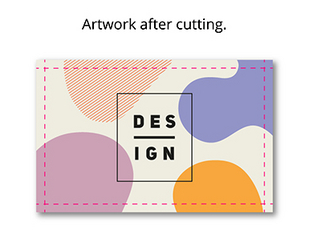
Everything within this area is guaranteed to appear on the finished product, even if the cutter were to stray inside of the crop marks by the maximum margin for error – 3mm.
The example below illustrates a correctly designed card with 3mm of bleed, safe area and crop marks.